CIRC 2022 Summer Competition Tasks
Disaster has struck the Martian settlement!
The colony’s nuclear power reactor complex has suffered a catastrophic accident. The local environment and its inhabitants are at great risk from the released radiation. Only your rover can contain the damage. To accomplish this, your rover will complete four day-time tasks and one night-time task. Your heroic actions will include saving vulnerable astronauts, repairing damaged equipment, and more. Each task will test a combination of rover skills such as navigation, arm manipulation, autonomy, and science. Detailed descriptions of each task are posted below. Good luck!
Reactor Patrol Route: Traversal Task
Description
The nuclear reactors require frequent monitoring and inspection. A patrol route has been made to inspect the reactors. It is your task to travel this route and do a routine inspection. Disaster is likely if the reactors are not visited and checked in a timely manner.
Requirements
-
Traverse to the provided GPS locations by approaching and visiting each waypoint.
-
There are 8 GPS locations. Rovers must reach each GPS location consecutively. Ex: 1 before 2, 2 before 3, 3 before 4, etc.
-
In the case of an intervention, the rover may start at the start line or at a waypoint that the rover has already reached successfully.
-
An attempt to navigate autonomously must be started from the start line or from a waypoint that the rover has already reached autonomously.
-
An attempt to navigate manually must be started from the start line or from a waypoint that the rover has already reached autonomously or manually.
- Example 1: you may not attempt to autonomously drive from waypoint 6 to waypoint 7 if you manually drove from the start through waypoints 1 to 6
- Example 2: you could decide to manually drive from 6 to 7 if you had autonomously driven from the start all the way to waypoint 6.
-
-
GPS coordinates are provided during setup time. The start location is not a GPS coordinate.
-
Points will be awarded for finding the GPS marker location and moving to within 5 meters of those markers as measured by a judge.
-
GPS locations 5 to 8 will include progressively more difficult terrain and may involve obstacle avoidance.
-
Extra points will be given to teams who can reach the GPS waypoints autonomously.
-
A 1% bonus per full minute under the time limit will be given to teams able to reach all 8 waypoints autonomously.
-
If a team successfully reaches all 8 waypoints successfully teleoperated, they may restart the course with no penalty to attempt the course autonomously.
-
-
At each site:
-
A marker will be placed at each GPS coordinate to represent the waypoint. Details of the marker will be made available on the website ahead of the competition.
-
Rovers must autonomously identify the status of the reactor by reading the code and then notifying the judge. The rover or base station software must output the result for the judge to see to receive full points. Refer to the Autonomy Guidelines section of the rules for more information on the codes that will be used.
-
Some points will be awarded if the camera is manually aimed at the marker and the rover autonomously identifies the code. More points will be awarded if the rover autonomously scans for the marker and identifies the code.
-
Disaster Response: Search & Rescue Task
Description
There has been an explosion at the settlement power reactor complex overnight, injuring one of our crew and spreading dangerously radioactive material around the area.
The local radiation levels are acutely dangerous. Rescue crews cannot safely approach the site. Our courageous astronaut will not survive long in these circumstances, and the exposed reactor core is a threat to the nearby settlement.
Your mission will be divided into two parts. First you must save and evacuate the astronaut from the area, and then you must ensure the area is safe for human crew to continue cleanup and operation.
Documentation Provided
Requirements
Phase 1: Save the astronaut
-
Minimize your exposure to radiation. The explosion has released large volumes of radioactive material, which will be harmful to the astronaut in need of assistance. Avoid dangerous zones indicated by the map of the aera. Also avoid obvious radiation sources like the reactor itself and any fragments of core material ejected in the explosion.
- The Astronaut is equipped with a personal health monitor. You will record the status light and value displayed upon finding him, and upon the conclusion of the task. Avoid a critical radiation dose!
-
Locate the astronaut in need of assistance. They will be in the vicinity of the reactors, but the exact position is not yet known as the radiation seems to be interfering with our ability to locate the emergency beacon.
-
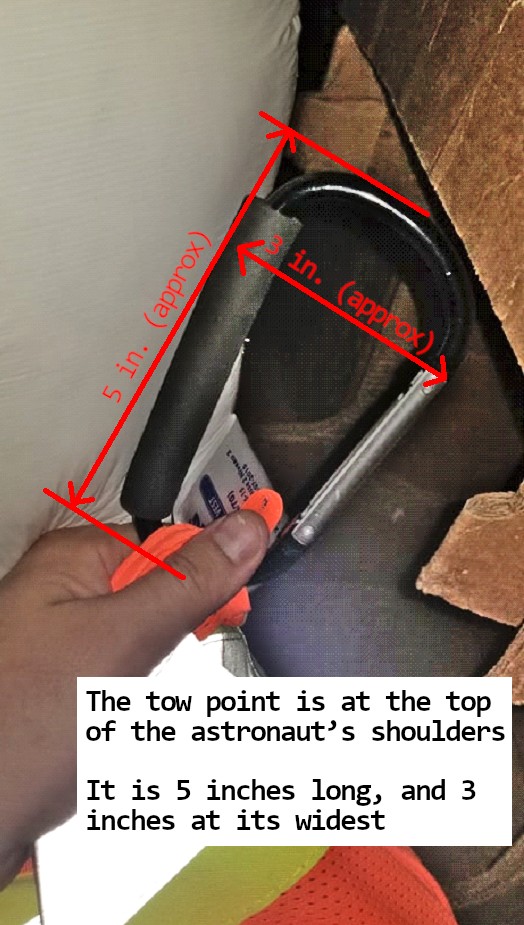
Remove the astronaut from the dangerous area. The spacesuit has an attached tow-hook for use in emergency situations like these. You must transport the astronaut back to the starting position before time runs out.
-
Keep in mind the area is scattered with radioactive debris. Close contact with this material will rapidly expose the astronaut to a critical dose. Use great caution in navigating around this material.
-
The astronaut is already injured. Any further injury caused by the extraction process will be penalized.
-
If your rover is unable to attach itself to the tow point, then teams may elect to have a teammate attach the hook and surrender the points involved. Note: this will not count as an intervention. This way, the team may still attempt to drag the astronaut to safety with only a minor score penalty.
-
Phase 2: Containment and Assessment
-
To determine whether it is safe for our crew to begin repair of containment of the reactor facility, we need information from the reactor control panels. Drive to the reactors and read from the panels any error or warning messages.
-
Also report qualitatively on any mechanical damage to the reactor - ruptured reaction chambers, burst coolant piping, damaged sensor cable harnessing, etc. Annotated diagrams of the panel, and the mechanical layout will be provided for reference.
Judge’s Commentary
-
The task will take place in the dark of night. Ensure your rover has adequate lighting or navigation systems to complete the task.
-
Because the astronaut was injured at the site before your task begins, their health monitor will not read zero when you find them. You will need to be careful when choosing an extraction route to ensure the astronaut doesn’t accumulate an unacceptable dose.
-
There will be no actual radioactive material at the competition. The health monitor will be providing simulated data only. Do not attempt to build your own dosimeter or radiation-harden your rover.
Pontifex Perplexus
Description
The settlement’s central cooling systems have sustained extensive damage as a result of the reactor explosion, and the lack of climate control is seriously hampering repair efforts. Use your rover to investigate the area, search for clues and materials, and repair the broken systems.
Tools Provided
-
Heat Exchanger Housing near starting point
-
Set of 14 colour-coded heat exchanger elements throughout the task area
-
Hose and Ball Valve attached to Heat Exchanger Housing
-
Coolant Disposal Tank near starting point
-
Sponge Supply Box containing 3 sponges near starting point
-
Gear Supply Box containing set of 3 numbered gears near starting point
-
Pump Control Cabinet, located beyond the Heat Exchanger Housing
-
Coolant Catchment Basin and Coolant Supply Port on or around Pump Control Cabinet
Documentation Provided
For each subtask, a manual page with an explanatory diagram will be placed randomly in the task area to be photographed by the rovers.
Requirements
Heat Exchanger Assembly
50 minutes will be given for teams to complete this phase of the task.
-
The Heat Exchanger Assembly manual page is located somewhere in the task area. Take a clear photo of this diagram with your rover camera and deliver it to a task judge via Slack or USB drive.
-
Each of your heat exchanger elements should be moved to within 1m of your heat exchanger housing.
-
Heat exchanger elements should be installed into the slots in the housing in order to enable your rover to drive across them. Note the placement restrictions on your manual page! If the rover is unable to drive on the elements due to wheel configuration, alternative arrangements will be provided.
Drive Gear Installation
50 minutes will be given for teams to complete this phase of the task.
-
The Drive Gear Assembly manual page is located somewhere in the task area. Take a clear photo of this diagram with your rover camera and deliver it to a task judge via Slack or USB drive.
-
There is a gearbox cover on the pump control cabinet. Fully open the cover using the twist handle.
-
There is a number on a label posted within the Pump Control Cabinet behind the gearbox cover. Take a clear photo of this label with your rover camera and deliver it to a task judge via Slack or USB drive.
-
Lift the correct numbered gear fully out of your gear supply box.
-
Drive across your Heat Exchanger Assembly while carrying the correct gear for your Pump Control Cabinet.
-
Install the correct gear fully onto the spindle behind the gearbox cover in your Pump Control Cabinet.
-
Close the gearbox cover using the twist handle.
Coolant Refilling
50 minutes will be given for teams to complete this phase of the task.
-
The Coolant Refilling manual page is located somewhere in the task area. Take a clear photo of this diagram with your rover camera and deliver it to a task judge via Slack or USB drive.
-
Used coolant has escaped into the Coolant Catchment Basin. Use the sponges from your Sponge Supply Box to deliver as much coolant as possible to your Coolant Disposal Tank. Sponges may be left in the Coolant Disposal Tank. Avoid contaminating the coolant by not dropping the sponges in the dirt.
-
There is a hose nearby each Heat Exchanger Housing. Push the free end of the hose into the opening of your Coolant Supply Port.
-
Fully open the ball valve attached to the hose.
-
The Pump Control Cabinet includes a toggle switch and a throttle slider. Flip the switch to “Fill” while the throttle slider is at 0%.
-
Move the slider to a position between 25% and 50% throttle, wait ten seconds, then flip the toggle switch back to “Circulate”.
-
After completing the previous two steps, move the slider to 100% throttle.
Notes
-
The task will be a collaborative task, meaning 2 or more teams may be on the site at one time. Not all steps may be available to complete at-will. Teams will be scored individually, and may work individually to collect points for the overall task completion. However, teams are also encouraged to work together strategically to optimize efficient task completion.
-
Time on site includes 15 minutes setup time, 15 minutes takedown time, and 150 minutes task time.
-
All personnel must remain outside the task area until invited by a judge or an intervention has been called.
-
Each of the three subtasks (Heat Exchanger Assembly, Drive Gear Installation, and Coolant Refilling) are scored independently according to the Pontifex Perplexus Rubric. Note that the total acheivable score for this task is 300 points.
-
Unless otherwise indicated, actions within subtasks may be completed in any order.
-
Due to the extended length and collaborative nature of this task, no score penalty will be assessed for the first two minor interventions called. Refer to Rules, Task Participation, Section 7.6 for the definition of a minor intervention. Changing or charging a battery on the robot can be done only once as a minor intervention. Additional battery changes count as a major intervention.
-
Rovers must be removed from the task area during an intervention and restart either at the starting point or the platform in front of the pump control cabinet. Relocating the rover is considered a major intervention.
-
While the rover is on the platform in front of the pump control cabinet, gears accidentally dropped by the rover may be manually recovered to any chosen point on the platform without calling an intervention.
-
Any other equipment carried by a rover when an intervention is called may be reset to its starting point or left at the intervention site if agreed to by all teams participating.
Land Speculation: Prospecting Task
Description
Following the catastrophic failure of the power supply at your current settlement, a new outpost must be constructed. A potentially suitable but unexplored area nearby has been identified from orbital surveys. All EVA-qualified astronauts are currently involved in damage control efforts and preparations for evacuation, so a rover must carry out the survey.
Teams must investigate the promising region and evaluate it for temporary and long-term settlement according to the included list of metrics. At least three discrete sites must be thoroughly recorded and documented. Record your survey route and note any landmarks or potential navigational hazards to facilitate the further development of the area.
The area has not yet been explored. A soil sample should be retrieved and analyzed both to determine whether or not the area meets the metrics for habitation and for scientific study. After the return of their rover, teams will have a short time to analyze their sample and compile a report on their findings and recommendations before the complex must be evacuated.
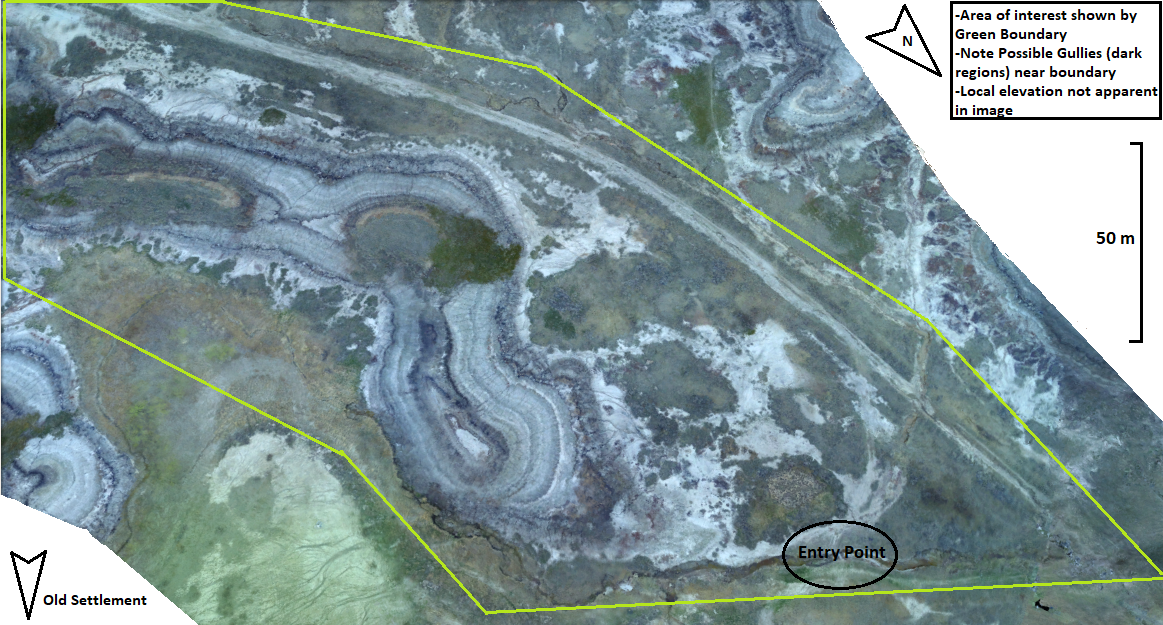
A map of the area will be provided prior to the competition.
Settlement
Three levels of development are possible in the near term.
Emergency Shelters are temporary structures that can house the evacuees from the settlement in slightly greater comfort and privacy than the rovers used to travel to the site. An Emergency Shelter can be built quickly in virtually any open area and disassembled for recycling or reuse when no longer needed. They are vulnerable to hostile environmental conditions and are unsuitable for long term habitation. Unless conditions in the area prevent it, an Emergency Shelter should be deployed as either housing during construction or cleanup, or as a base to continue the search for a new site.
Outposts are medium structures that ordinarily host a scientific team, though all of the evacuees could be housed until another site can be found or cleanup at the previous settlement is completed. They require some time to set up and cannot be easily disassembled, but are much more resilient than Emergency Shelters. Outposts are not fully self-sufficient, and care must be taken to ensure resupply is feasible. An Outpost should be deployed if the area is judged to have features of scientific interest, but is not suitable for permanent settlement at this time.
Habitation Complexes are large structures that house many astronauts and their equipment on a permanent basis, and serve as a home base for operations over a wider area. Habitation Complexes require a great deal of effort and material to construct, but serve as the nucleus of a larger settlement. A large area of stable ground is needed to support such a structure, and provisions for power generation and vehicle access. A Habitation Complex should be constructed if the area is suitable for long term habitation, and would serve as a replacement for the previous settlement.
Site Metrics
-
Available Space:
-
Emergency Shelter - 8.0 meters x 6.0 meters
-
Outpost - 10.0 meters x 6.5 meters
-
Habitation Complex - 15.0 meters x 7.5 meters
-
-
Resources:
-
Mineral Resources:
-
Metal ore
-
Carbonaceous materials
-
-
Soil Composition
-
Water content
-
Nutrients
-
-
Scientific Potential
-
Signs of life
-
Geological interest
-
-
-
Development Potential:
-
Easy route to chosen site
-
Terrain suitable for building
-
Shelter from inclement weather
-
Suitability for expansion
-
Requirements
-
Travel to at least three (3) discrete locations. The following actions must be undertaken during the survey:
-
Record the route taken using GPS waypoints.
-
Document and photograph any landmarks or navigational hazards in the area. Estimate their location relative to your route.
-
-
At each site:
-
Record the GPS coordinates of the extents of the chosen site, i.e. record the GPS coordinates such that the site can be represented on the map by a polygon with vertices at the coordinates.
-
Take a panorama photograph of the site. A minimum of 180o is required, with 360o required for full points. Select a point with good visibility somewhere within the previously recorded extents. Record the GPS coordinates of the point at which the panorama was taken.
-
Take photographs documenting the site’s compliance (or lack thereof) with the above metrics.
-
Collect a 5 - 100 g soil sample for further study. The test must not deposit any foreign materials in the test area. Samples must be kept separate from one another.
-
Report
-
Following completion of the rover’s time on the task site, teams will have three hours to perform additional tests on the sample, and write and submit a report of up to 3500 words (excluding references, if present) on their execution of the task and their findings. Reports should be submitted to the judges via the Slack workspace dedicated to the event. No reports will be accepted after three hours. The report must include:
-
Abstract:
- Summarize the situation and the purpose of the report, and provide a high-level overview of the procedure and findings.
-
Search procedure and route:
-
Provide an explanation of the approach to the survey used by the team. Justify the areas investigated and the route taken.
-
Show a map of the search area. Indicate on the map the route taken by the rover, the extents of each site, and the locations of any landmarks, navigational hazards, or other features of interest spotted during the survey.
-
-
Report on site(s):
-
State the GPS coordinates recorded at the site.
-
Show the panorama photograph of the site and the GPS coordinates at which it was taken. Indicate the direction from which the site was approached and comment on any visible landmarks.
-
State the observations at each site. Show the photos taken during the survey and explain their significance.
-
Describe the sample collected. Justify the selection of site from which it was collected.
-
Explain the methodology of the tests carried out on the sample.
-
Describe the results of the tests on the sample and their significance.
-
Describe the route to the selected site. Describe and comment on the non-site-related features noted during the survey.
-
-
Analysis:
-
State your recommendations for the development of the area. Address each site and any other observations from the survey. Justify your recommendation using the evidence and observations described elsewhere in the report.
-
Make suggestions for execution of the evacuation, resettlement, and long-term development (if applicable). These suggestions could include both engineering goals (e.g. development of mineral resources or construction of additional facilities) and scientific studies (e.g. preservation of geologically interesting region or a plan to collect a range of core samples) at the site.
-
-
Judge’s Commentary
-
Teams are free to select multiple sites in close proximity to one another, but will be required to justify how the sites were differentiated (e.g. separated by physical feature of the area, must be approached via different routes, etc.) in their report to receive full points for identifying multiple sites.
-
Take care when rounding GPS coordinates. Rounding to three decimal places has introduced errors of up to 40 meters in previous events.
-
Consider multiple possibilities when formulating your approach and recommendations.
-
Teams are strongly encouraged to submit their report even if they cannot complete the field task. Points will be awarded for all sections of the report that can be completed without data from the field (e.g. the intended exploration route, any observations that could be made from the rover, the intended experiments, recommendations for further study, etc).
-
Similarly, consider starting the report ahead of time. Aspects that are not dependent on your results and can be completed in advance to free up time before the deadline. Establishing an outline and skeleton can also save time for writing up your results.
-
Tell the story of the investigation and tests. Link your various sections together.
-
All metrics, even those that are not met, should be addressed when describing and comparing the sites.
-
The “why” and “how” are as valuable as the “what” in reports. In addition to describing observations, experiments, or decisions, provide an explanation of their meaning.
-
Differentiate between what your plan was and what you were able to accomplish.
-
Be honest about technical difficulties when writing the report.
-
Clearly state what is fact and what is speculation in your report. For example, describing the site as “rich in ironstone” would be accurate only if a sample of the rock was obtained and tested or closely examined by an expert. If this was not done, a team should simply provide a physical description of the rocks, and may add that it resembles ironstone.
-
Similarly, reports should differentiate between observations that can indicate some features and those that necessitate it. For example, water is a necessary precondition to life as we know it. Thus, identifiable life suggests the presence of water, but the presence of water does not necessarily indicate the presence of life.
-
Any assumptions made in the report must be stated explicitly.
-
Figures must be described in full, either through a descriptive caption or references in the text. Figures without proper description are not useful.
-
Good spelling and grammar are appreciated. If there’s no time to proofread, run the document through the spelling/grammar check before submitting. No penalties are applied, but a well-presented report is more enjoyable to read, and seems more compelling in its arguments.
Reactor Operation: Arm Dexterity Task
Description
A catastrophic seismic event has caused a critical failure at the nearby nuclear reactor facility. All systems in the region have switched to emergency power, but will only stay active for one hour. It is up to your team to quickly determine what actions are necessary to fix the system and redirect power back to the region. The automated reactor is unmanned, your team must operate a rover stationed at the power switch board at the reactor for just such emergencies.
Documentation Provided
- Manual describing how to activate each button
Requirements
- Return power on to each of the three Reactor Control Panels
Notes
- Control Panels
- There are three control panels;
- Each control panel is an individual entity and may require traversal from one panel to another;
- Buttons will be located at heights between 300 mm and 900 mm above the ground;
- Each panel will increase in difficulty from 1 - 3;
- Each panel has lights that indicate if the button pressed was the correct button or not.
- Panel 1
- 9 button grid;
- Simple arcade-style push buttons;
- Proper sequence of buttons to press outlined in manual.
- Panel 2
- First, activate buttons by properly toggling the 4 switches along top of triangle;
- There are 15 buttons that form a triangle;
- Start at top of the triangle and work way down, 1 correct button per row;
- If you press a wrong button you have to start again from the beginning;
- The manual will indicate a possible sequences of buttons to press, only one will be correct.
- Panel 3
- First, use a joystick to activate lights in a pattern as described in the manual;
- Second, activate the button by turning a rotary switch to 3 correct positions in a sequential order;
- Third, press the button when the correct light pattern is being displayed on the board.
- Rover functions
- Press buttons;
- Flip switches;
- Turn rotary switches;
- Manipulate a joystick.
Rovelympics
As always, the bonus just-for-fun task will be hosted at the end of CIRC. For more information see its dedicated page: Rovelympics.